Setting Up Your Team
A team is a shared workspace. Your workflows, app connections, secrets and files all belong to one, even when you work alone.
You already have one. Signing up walks you through Set Up Your Workspace, so the team you are working in now was created with your account. This page is about the rest: adding more teams, inviting people, and deciding what each of them can do.
Create another team
One team is enough for most companies. A second is worth having when the work should not mix: a workspace per client if you build for other companies, a separate one for a side project, or one for experiments you do not want beside production automations.
- Click your workspace name at the top of the sidebar and choose Create new under Other teams.
- Enter a Team Name. This will appear in your sidebar and URLs.
- Optionally add a description so members know the team’s purpose.
- Click Create Team to finish.
Switching between teams switches the whole view: each one has its own workflows, connections, variables and run history, and nothing is shared between them.
Your role is on your account, not on a team. The Individual / Team, Consultant or MSP answer you gave when you signed up describes how you work, so it carries across every team you belong to and is not asked again here. It is not a permission level either: what you and your teammates may do is set by Team Roles below.
Building for other companies? Consultant and MSP accounts get the multi-tenancy platform: a workspace per client, delegation grants your client consents to, and one console across every client you work with. Your account team turns it on with you. See Working With Clients.
You are automatically assigned the Admin role for any team you create.
Tip: You can create multiple teams to separate projects or departments. For example, you might have one team for marketing automations and another for engineering ops.
Invite team members
Once your team is created, you can invite collaborators.
- Open the team and click Invite Members to open the invite modal.
- Enter one or more email addresses.
- Select a role for each invitee (see roles below).
- Click Send Invites.
Invitees receive an email with an invite code. They can accept the invitation by entering the code when prompted, which adds them to the team immediately.
Team roles
Glow provides three roles. They control team administration: who can bill, who can manage people, who can change shared values.
| Role | Can |
|---|---|
| Admin | Everything below, plus billing management, invoices and payments, team settings, inviting and removing anyone, changing any role, and deleting the team. |
| Manager | Everything below, plus inviting Managers and Members, changing Manager and Member roles, and managing team variables. |
| Member | Build, edit and run workflows. View usage and pricing. Manage team files. View team variables. Invite further Members, and cancel or remove invitations they sent. |
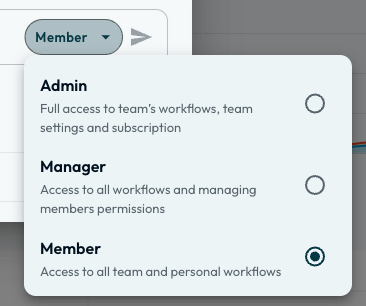
Roles govern team administration, not workflow access. Every role, Member included, can create, edit and run any workflow in the team. To limit who can open a particular workflow, set that on the workflow itself. See Workflow Visibility and Sharing. Assigning someone Member will not give you read-only access.
Two things worth knowing before you assign roles:
- Members can invite other Members. Bringing one person in lets them bring in others at the same level.
- Team files are open to everyone. Any role can upload, rename and delete them, so a shared configuration file can be removed by anyone on the team. Secrets and team variables are the ones genuinely restricted. Members can see variable keys but not change them, and only Admins and Managers manage them.
Choose roles based on each person’s responsibility. You can change a member’s role at any time from the team settings.
Removing someone
Admins and Managers remove people from team settings. Removing someone takes away their access to the workspace; it does not delete the workflows they built or the connections they authorised, since those belong to the team rather than to them.
Worth checking before someone leaves: any connection they authorised under a personal account of their own. The connection stays, but it points at an account the team no longer controls, and the steps using it fail once that account is closed. Re-authorise those under an account the team owns.
What teams contain
Each team workspace holds four types of resources:
- Workflows: the automations you build on the canvas
- Connections: authenticated links to third-party apps (e.g., Slack, Google Sheets, Stripe)
- Secrets: API keys, tokens, and other sensitive values used by your workflows
- Files: uploaded assets that workflows can reference or process
All of these resources are shared across the team according to each member’s role permissions.
What’s Next?
- 👉 Navigate the Dashboard → to find workflows, settings and the control for creating an automation.
- Ready to build already? Head to Your First Workflow.